
Combine a favorite furniture style with one of today’s flat screens.
Overall dimensions: 48"w × 20"d × 29"h
The transformation of large screen televisions from 350-pound, 3'-deep behemoths to slim, lightweight flat panels makes them easier than ever to fit into any home decor. Keeping up with this change is this handsome table which sheds light on the latest approach to home entertainment. Accommodating flat screen TVs up to 42" wide, its thoughtful design provides open storage for a surround sound receiver, DVD player, and center-channel speaker. Two drawers below offer ample DVD storage while the back panel conceals the wall outlet and tangle of cords and cables.
Staying true to the Arts & Crafts aesthetic, I used quartersawn oak for this project. The dark stain allowed me to economize by substituting red oak for the more expensive traditional white oak. That said, the quartersawn lumber can present a dilemma when making legs: The highly prized ray pattern of the face grain ends up contrasting abruptly with the flatsawn edge grain. To fix the problem, I laminated the leg assemblies so quartersawn grain appears on all leg faces. I also glued up each leg to create through mortises without drilling and chisel work. Enjoy these techniques, and, of course, the finished project.
Note: For the items used to make this project, see the Convenience-Plus Buying Guide below.


Laminate the legs
Note: As shown in Figure 2, each leg consists of two 3⁄4"-thick sides, three 3⁄4"-thick core parts of different lengths, and two 1⁄8"-thick faces. I cut all of these pieces longer at first, except for the 9 1⁄4" middle core. During the leg glue-ups, I used 6"- and 7 1⁄4"-long spacers to separate the core pieces. These I tinted red. After the glue dried, I knocked them out of the resulting mortise openings.
1 For each laminated leg (A), cut 3⁄4"-thick stock for two sides and a core to 2 1⁄8 × 31" (3" longer than the leg’s finished dimension). Select the parts with the best quartersawn figure for the sides. Then group two sides and a core part for each leg. Mark the top ends of each group with the location (LF and RF for left and right front and LR and RR for left and right rear) for proper placement later.


2 Cut the core parts for each leg to the dimensions in Figure 2.
Cut the two mortise spacers from the core pieces. To keep the spacers from adhering to the sides during the glue-up, wrap the ends with plastic packaging tape. Then apply glue to both faces of the remaining core segments (not the spacers) and glue up the legs (Photo A).
3 With the glue dry, tap out the mortise spacers using a mallet and scrapwood block. Then scrape away any excess glue, and joint one edge of each leg (A). Now plane the opposite edge to make each leg blank 2" wide.
4 Cut four 3⁄4 × 2 1⁄2 × 31" face blanks, and resaw each one in half. Plane each half to 1⁄8" thick to make eight leg faces. Then glue and clamp the faces to the edges of the leg blanks, covering the mortises, as shown in Photo B and where shown in Figure 2.


5 With the glue dry, drill 1⁄2" holes through the faces of legs (A), centered in the mortises. Then rout the faces to open the mortises as shown in Photo C. Square the corners of the openings with a chisel, and pare away any excess glue on the inside of the mortise. Now flush-trim the protruding leg face edges.
6 Trim the top of each leg (A) 3⁄4" from the top edge of the upper mortise. Transfer the leg location mark to the top of the leg. Then trim the bottom of each leg to the finished length of 28". Now chuck a 45° chamfer bit into your handheld router, and rout chamfers along the edges and bottom end of each leg. Finish-sand the legs to 220 grit.
Make the rails, spindles, spacers, and corbels
1 From 1"-thick stock, cut the upper rails (B) and lower rails (C) to the sizes in the Cut List. Then form the tenons at your tablesaw where dimensioned on Figure 2. You can cut the tenons in several passes with a dado blade, positioning the rip fence as a stop and guiding the workpiece with the miter gauge, or use a tenon jig. Should your tenons be too thick for the mortises, touch them up with a shoulder plane or sanding block. Now rout 1⁄8" chamfers on the tenon ends, using a handheld trim router. Here, chamfer the tenon corners first to avoid tear-out.
2 With the dado blade in your tablesaw, form a centered 3⁄4" groove 1⁄4" deep in the bottom edge of each upper rail (B) and in the top edge of each lower rail (C). Finish-sand the rails.
3 Cut the spindles (D) to size, checking the fit in the rail grooves. Finish-sand the spindles.
4 To make the spacer blanks (E), cut four 3⁄4 × 1 1⁄2 × 12" boards. Chuck a chamfer bit into your table-mounted router and rout 1⁄8" chamfers along the edges of each board. Then rip 3⁄8"-wide strips from each chamfered edge. Finish-sand the blanks. Now crosscut five 1"-long spacers from each blank, and set aside the remaining pieces. The remaining eight spacers are cut to final length from these pieces during assembly.
5 For the corbels (F), cut four blanks from 1" stock to the size shown on the Cut List. Photocopy the Corbel Pattern on page 73 and adhere it to one blank with spray adhesive. Cut the 45° angle at the bottom of the corbel on your tablesaw or mitersaw. Bandsaw and sand the curve to the pattern line. Then use this corbel as a template to trace the outline on the remaining blanks. Cut the bottom angle on each blank as before and bandsaw the blanks just outside the traced line. Now template-rout the curve on each rough-cut corbel as shown in Photo D.
6 Rout 1⁄8" chamfers along the corbel edges, where shown on the Corbel Pattern. Finish-sand the corbels.

Put together the leg assemblies
1 Spread glue on the upper rail (B) and lower rail (C) tenons and slide them into the leg (A) mortises. Make sure the legs are in the correct orientation and that the best face of each rail faces out. Clamp the assemblies.
2 Retrieve the 1"-long spacers cut from the spacer blanks (E). Mark the position of the center spacer on masking tape applied to the upper and lower rails (B, C). The spacers are centered between the legs (A). Glue and clamp the center spacers in place. Now install the spindles (D) and remaining 1" spacers, as shown in Photo E.
3 With all the spindles in place, measure the distance between each front and back spindle (D) and the legs (A). Cut spacers to fit from the spacer-blank cutoffs and glue them in place.
4 Glue and clamp the corbels (F) to the legs (A), flush at the top and centered.


Add the cases and cut the back
1 Before cutting the case parts to size, check the dimension between the legs (A) on the leg assemblies. The cases must fit between the legs. Then from 3⁄4" plywood, cut the tops and bottoms (G), upper ends (H), upper divider (I), and lower ends and divider (J) to size. Drill the 5⁄32" countersunk shank holes, and then rout the 3⁄16 × 1⁄2" slots in the upper top only (Figure 3 Slot Detail).
2 Cut the upper end bands (K) to size and glue, and clamp them to the front edges of the upper ends (H). Then plunge slots for #20 biscuits in the case parts, where shown on Figure 3. Finish-sand the case parts. Now glue, biscuit, and clamp the cases.
3 Apply glue to the inside faces of the upper rails (B) and lower rails (C), and clamp the cases in place, as shown in Photo F.
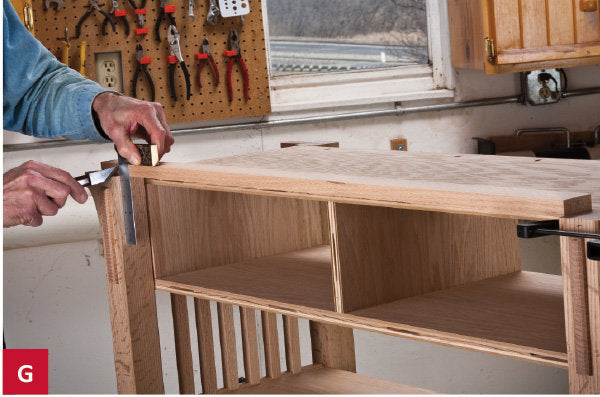
4 Cut the long bands (L), upper divider bands (M), and lower divider bands (N) 1" longer than listed. Mark the finished length of the long bands, as shown in Photo G.


5 Transfer the biscuit slot locations from the cases to the long bands (L) and plunge biscuit slots in the bands. Then dry-fit the bands in place, and measure the final lengths of the upper and lower divider bands (M, N). Cut the divider bands to length. Transfer the biscuit slot locations from the cases to the divider bands and plunge the slots. Now glue, biscuit, and clamp the bands to the cases.
6 Cut the cleats (O) to size, and glue and clamp them to the legs (A) between the upper and lower cases, flush with the edges of the rear long bands (L).
7 Check the Cut List dimensions of the back (P) with its placement, and cut the part to size. Lay out the cord openings, where indicated on Figure 4. Drill a 1⁄2" hole inside the layout lines, and rough-cut the openings with a jigsaw, staying inside the lines. Position guide blocks, as shown in Photo H, and flush-trim the openings to finished size, as shown in Photo I.
8 Drill countersunk screw-shank holes through the back (P), where shown on Figure 4. Finish-sand the back.

Buying dovetailed drawer boxes makes good cents
Many professional woodworkers who feature dovetailed drawer boxes in their casework have come to a surprising conclusion: They can order custom-sized, ready-to-assemble boxes from specialty manufacturers for less money than they can make them in their own shop. For this project, we took advantage of their experience and ordered our own ready-to-assemble boxes. The boxes feature 5⁄8"-thick fronts, backs, and sides and 1⁄4" Baltic birch plywood bottoms. The standard 1⁄2" bottom recess accommodates the under-mount drawer slides specified for this project. I found the box parts flawlessly machined and in need of only a quick 220-grit finish-sanding. See the Convenience-Plus Buying Guide below for the ready-to-assemble dovetailed drawer boxes and help for converting fractions to decimals, which are required for the order.


Assemble the drawers and build the top
1 Finish-sand the dovetailed drawer-box parts. (See "Buying dovetailed drawer boxes makes good cents" above for information on purchasing ready-to-assemble dovetailed drawer boxes.) If you choose to make the drawer boxes, see Figure 5 for the dimensions, keeping in mind that your drawer opening may vary slightly. Now, apply glue to the drawer-bottom grooves and the dovetail sockets (or alternative drawer joints) and clamp the boxes. Check for square by measuring the box diagonals. (Equal diagonals indicate a square box.) Place the boxes on a flat surface to dry.
2 With the glue dry, cut notches (I used my trim router and flush-trim bit ) and drill holes in the drawer-box backs for the under-mount drawer slides, where dimensioned on Figure 5 and following the hardware instructions.
3 Measure the drawer openings in the lower case and cut the drawer fronts (Q) to size. The fronts should be 1⁄8" less in each dimension than the drawer openings. (I cut the fronts from a single board so the grain reads continuously across both.) Finish-sand the drawer fronts.
4 From 1"-thick stock, glue up an oversized blank for the top (R). With the glue dry, sand the top smooth and rout 1⁄8" chamfers along the bottom ends and edges. Center the top on the base and clamp it in place. Then mark the locations of the screw holes along the front of the upper case and the centers of the slots along the back on the bottom face of the top with an awl. Now remove the top and drill pilot holes for #8 screws at the marks. Finish-sand the top.

Finish and final assembly
1 Inspect all parts and assemblies and finish-sand where needed. (I stained all the oak parts with a one-to-one mixture of Varathane Premium Wood Stain colors golden mahogany and red mahogany. You’ll need 32 ounces of the stain mixture for this project. The drawer boxes received only a clear finish.) With the stain dry, I applied two coats of semi-gloss polyurethane, lightly sanding with 220-grit sandpaper between coats.
2 Mount the drawer-slide locking devices in the drawer bottom recesses, as indicated on the manufacturer’s instructions. Then mount the full-extension slides in the drawer case (Photo J). Now slide the drawer boxes onto the slides until the hooks at the rear of the slides engage the holes in the drawer box backs and the drawer-slide locking devices click into place.
3 Install the drawer pulls on the drawer fronts (Q). Then position the drawer fronts on the drawer boxes (Photo K). Clamp the fronts to the boxes. Now drill pilot and countersunk shank holes through the drawer boxes and into the drawer fronts. Secure the fronts to the boxes with #8 × 1" flathead wood screws.
4 Position the top (R) on the base, and fasten it to the upper case with #8 × 1 1⁄2" flathead wood screws at the front and #8 × 1 1⁄2" panhead screws and washers at the back.
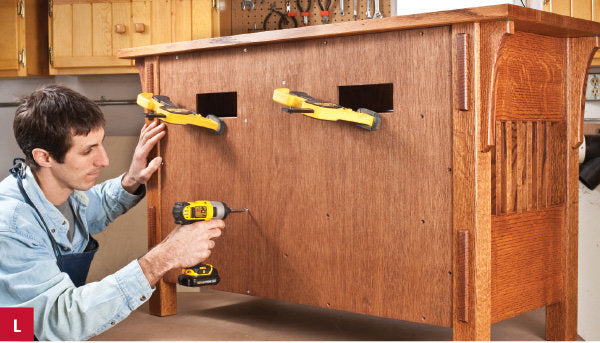
5 Install the back (P) as shown in Photo L.


